I’m back with another simple and affordable DIY. So, as I mentioned at the end of my previous post (which can be read here) I recently embarked on this or rather became serious about my makeup game. Still on a budget, I asked my brother to bring me some stuff from the States which I bought from this online store called Shop MissA.Everything in this store costs $1. Yes ONE DOLLAR! I did do my research though before I plunged in because it just seemed too good to be true! Youtube reviews are your friends. Anyway I am absolutely happy with everything I got. The colour payoff on the lipsticks and eyeshadows is amazing! But I will save that talk for another day! Onto the DIY!
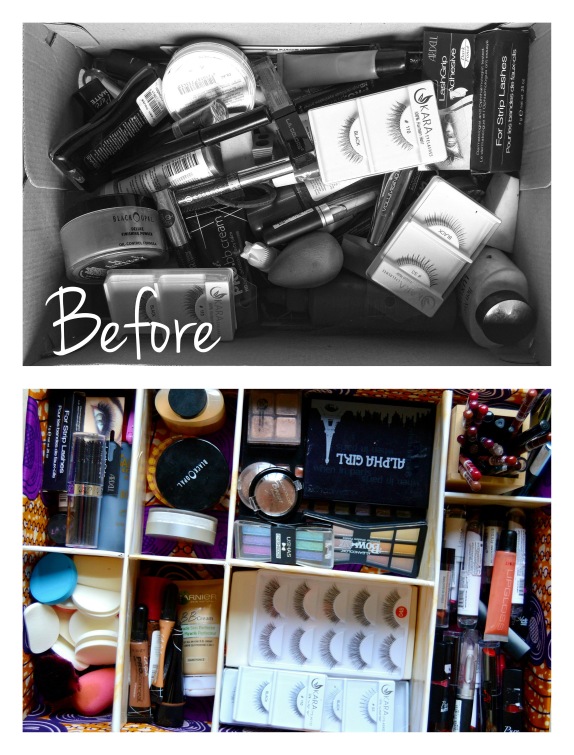
After these purchases I realised I didn’t have anywhere to store all the makeup and I am not financially stable enough to buy an acrylic makeup stand thingy for like R900. Nah fam, we can do other things with the money. Haha! I decided to make my own Makeup storage from the things I had lying around, well a BOX. I hope you like this one
PS : This doesn’t have to be for makeup only, you can use it for just about anything you want to keep organised.
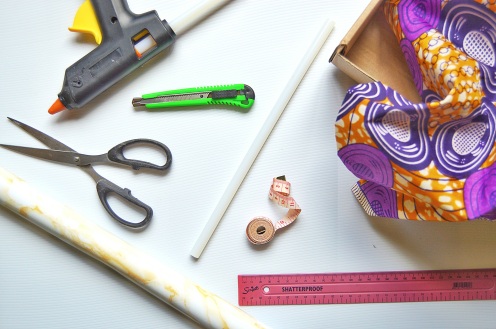
What you’ll need :
A box
Material (I used African Print because… you know me.lol)
Foam board
Contact paper
A pair of scissors
Glue gun + gluesticks
Craft knife
Ruler
Measuring tape
Let’s get started!
Step 1 : Measure the length width and height of your box (as shown above) and write down these meaurements.Step 2 : On a scrap peice of paper draw out the shape of your box. Write a list of either the number of compartments you will need or the items you need to organise like I did. And then according to this list divide your little box. This is trial and error and you need to keep going back to the original box.Step 3 : Divide the foam board into about 5 sections and cut it using the craft knife. When cut the width of the foam board should be the same length as the height of the box. The length of the foam board should be the same length as the width of the box. NB This is according to my desired design.
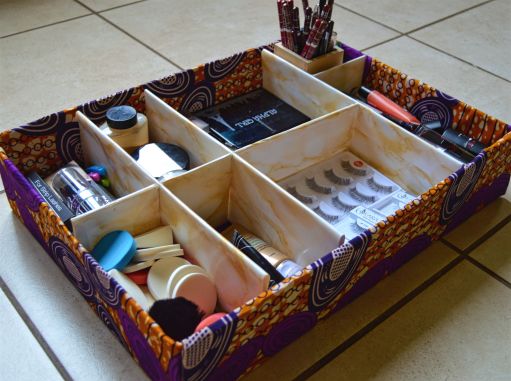
Step 4 : Test the pieces out in the box. You can see that I cut some of the original pieces of foam board into smaller piece in order to divide the compartments.Step 5 : Cover the pieces of foam board with some contact paper. You can also use material and spray adhesive as an alternative. Number your pieces in the order in which you will place them in the box so that you do not get confused.Step 6 : 1) Take the box apart and place it onto the material. Cut a piece big enough to cover the whole box. Cut the material on the parts that are marked in red so that the material can fold over when you are sticking it down. 2) Cut a piece of material that is big enough to cover the center of the box. Stick everything down using the glue gun ensuring that all the parts of the box are covered.This is the result when you put the box back together.Step 7 : Place the pieces of foam board back into the box in the correct order. And then stick them together using the glue gun to ensure that they are sturdy in the box. This step is optional in case you want to change it around over time.This is the finished result!!!And then everything was organised!
And there it is! Feel free to change it up! Let’s have fun, discover and share!
A simple girl on her journey into herself. Rooted in who I am, TeteHumba, and ready to share this journey as I grow and find my purpose in this world sharing the lessons learned along the way. I love all things DIY so I will be sharing a lot of my simple projects as well as a few tips that I've learnt here and there! Let's have fun, discover and share!
View all posts by tetehumba


Thanks for the share! Please follow back thanks https://lizskincare.org =)
LikeLiked by 1 person
Love this!!!! Have to try it 😊
LikeLiked by 1 person
You definitely should! It’s so simple!! 😀
LikeLiked by 1 person
Love the this!! Need to try it out.
LikeLiked by 1 person
Thank you!! You totally should! And if you do, do share the results!
LikeLiked by 1 person
I must make time to try this
LikeLiked by 1 person
You’ll be surprised it won’t take as long as it seems. Go for it!
LikeLike